
Week 9 — Document Object Model (DOM)
This week covers HTML, CSS, the DOM API, events and callback functions.
HTML
- HTML ⟶ a markup language. A structure for web pages (originates from XML).
- Tags are denoted by angle brackets.
- Almost every web page has a head and a body.
- Head ⟶ where CSS and javascript files are loaded. Loaded before the rest of the page.
<html>
    <head>
        <script type="text/javascript" src="sketch.js"></script>
        <link rel="stylesheet" type="text/css" href="style.css">
    </head>
    <body>
    </body>
</html>- If a javascript file or a library fails to load, the head is the first place to look.
CSS vs Javascript
- CSS (Cascading Style Sheets) ⟶ for styling elements.
- Javascript ⟶ for interaction and logic. eg., mouse movement, clicking and navigating a page.
div.awesome {
    background-color: red;
}
HTML Elements (Tags)
- div ⟶ most common element. A block element, other elements can be nested inside it.
- img ⟶ image
- a ⟶ anchor, a hyperlink to another page
- p ⟶ paragraph, a place to write text
- canvas ⟶ what p5js draws on
Attributes
- id ⟶ identifies a specific element. Unique, no two elements can have the same id.
- src ⟶ source, links to images
- href ⟶ hyperlink reference, where the anchor goes on click
- class ⟶ like id, but can be applied to multiple elements. Useful for CSS styling.
<div id="container" class="awesome">
    <img src="cat.jpg">
    <a href="https://p5js.org">p5js</a>
    <p class="awesome">Some text</p>
</div>
p5js app anatomy (index.html)
<head>
    <script src="../../libraries/p5.min.js"></script>
    <script src="../../libraries/p5.sound.min.js"></script>
</head>
<body>
    <script src="sketch.js"></script>
</body>
Note:
- HTML loads elements one at a time (synchronously).
- Always load libraries (dependencies) before sketch.js. Otherwise ⟶ error: p5 is not defined.
What is the DOM?
- DOM ⟶ Document Object Model.
- A way to tap into HTML using javascript ⟶ manipulate HTML elements and handle interaction with them.
- p5js sits on top of the native javascript DOM API and makes it friendlier to use.
- In the course, this needed the p5.dom library. It is now part of p5js itself, so no extra script tag is needed.
HTML Elements
Creating elements
- createCanvas() ⟶ creates the canvas DOM element. This was a DOM element all along.
createDiv("text or html");
createP("paragraph");
createButton("click me");
createImg("path/to/image.jpg", "alt text");
createSlider(min, max, value);

// generic ⟶ (tag name, content)
createElement("h1", "Hi, I'm a header1");- HTML can be written inline inside these functions.
createDiv("Hi there, I'm inside the DOM. <a href='https://p5js.org'>p5js</a>");Code in folder /9.4-CreatingElements
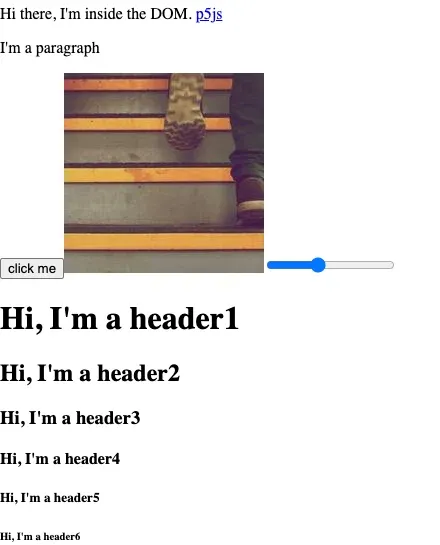
Positioning elements
var myDiv = createDiv("Hello, I'm a div");
myDiv.position(x, y);- translate() works only inside the canvas. DOM elements need position().
- position is relative to the browser window, not the canvas ⟶ use windowWidth, windowHeight.
- Create an element only once (in setup) and keep a reference in a variable. Don’t create it in draw.
Example (code in folder /9.4-PositioningElements)
var header;

function setup() {
    noCanvas();
    header = createElement("h1", 'Hi, I\'m an H1 tag');
    frameRate(1);
}

function draw() {
    header.position(random(windowWidth), random(windowHeight));
}- \ ⟶ escape character. To use a quotation mark inside a string with the same quotation marks.
Injecting HTML
- html() ⟶ sets the content inside an element.
- DOM elements can be stored in arrays like any other object.
- There is no rotate() for DOM elements ⟶ use sin and cos to place them in a circle.
Example (code in folder /9.4-InjectingHTML)
var elements = [];

function setup() {
    noCanvas();
    for (var i = 0; i < 10; i++) {
        var elm = createElement("h1", "");
        var angle = map(i, 0, 10, 0, TWO_PI);
        elm.position(cos(angle) * 300 + windowWidth / 2, sin(angle) * 300 + windowHeight / 2);
        elements.push(elm);
    }
}

function draw() {
    for (var i = 0; i < elements.length; i++) {
        elements[i].html(frameCount);
    }
}
Synchronous vs Asynchronous Code
- Synchronous ⟶ executes line by line. Moves to the next line when the current one is done. eg., draw() runs through its lines once per frame.
- Asynchronous ⟶ runs only when an event happens. eg., mouseClicked() fires only when the mouse is clicked. It doesn’t check every frame.
// synchronous
function draw() {
    background(220);
    ellipse(50, 50, 20);
}

// asynchronous
function mouseClicked() {
    drawCircle();
}
Events
Some built-in events in p5js
- mousePressed()
- mouseOver()
- drop()
- dragOver()
More in the p5js reference
- Mouse events used so far (mouseX, mousePressed) are events attached to the canvas element.
- Events can be attached to other elements too ⟶ buttons, inputs, divs etc.
Example: Button (code in folder /9.6-ButtonEvent) ⟶ changes background color on click.
var button;
var bg;

function setup() {
    createCanvas(windowWidth, windowHeight);
    bg = color(0);
    button = createElement("button", "click me");
    button.position(20, 20);
    button.mousePressed(function () {
        bg = color(random(255), random(255), random(255));
    });
}

function draw() {
    background(bg);
}Example: Text Input (code in folder /9.6-TextInput) ⟶ writes the typed text at a random position on enter.
var inputTextElement;
var inputText = "";

function setup() {
    createCanvas(windowWidth, windowHeight);
    inputTextElement = createInput();
    inputTextElement.position(20, 20);
    inputTextElement.input(handleInput);
}

function handleInput() {
    // this ⟶ refers to the input element (like this in a class)
    inputText = this.value();
}

function keyPressed() {
    if (keyCode === ENTER) {
        text(inputText, random(width), random(height));
    }
}- No draw() needed. Everything happens on events.
- In the course, enter key is checked using key == “\r” ⟶ carriage return (from typewriters). keyCode === ENTER is the same thing.
Callback Functions
- A function passed to another function, called later when the event happens.
- No round brackets when passing the callback. Brackets would call it right away.
function whoop() {
    print("whoop whoop");
}

// named callback
button.mouseClicked(whoop);

// anonymous callback ⟶ function without a name
button.mouseClicked(function () {
    print("whoop whoop");
});- Prefer named functions for readability. Anonymous functions are fine for simple things.
Example sketches
The p5 sketches for this week, from the course repo.
9.4 — Creating Elementsrepo ↗
// No createCanvas() here. createCanvas() is also just creating a DOM element.
function setup() {
  createDiv("Hi there, I'm inside the DOM. <a href='https://p5js.org'>p5js</a>");
  createP("I'm a paragraph");
  createButton("click me");
  createImg("https://picsum.photos/200", "random image");
  createSlider(0, 255, 100);
  createElement("h1", "Hi, I'm a header1");
  createElement("h2", "Hi, I'm a header2");
  createElement("h3", "Hi, I'm a header3");
  createElement("h4", "Hi, I'm a header4");
  createElement("h5", "Hi, I'm a header5");
  createElement("h6", "Hi, I'm a header6");
}
9.4 — Injecting HTMLrepo ↗
var elements = [];
var radius = 300;

function setup() {
  noCanvas();
  for (var i = 0; i < 10; i++) {
    var elm = createElement("h1", "");
    var angle = map(i, 0, 10, 0, TWO_PI);
    elm.position(
      cos(angle) * radius + windowWidth / 2,
      sin(angle) * radius + windowHeight / 2
    );
    elements.push(elm);
  }
}

function draw() {
  for (var i = 0; i < elements.length; i++) {
    elements[i].html(frameCount);
  }
}
9.4 — Positioning Elementsrepo ↗
var header;

function setup() {
  noCanvas();
  header = createElement("h1", "Hi, I'm an H1 tag");
  frameRate(1);
}

function draw() {
  // translate() only works inside the canvas, so position() is used for DOM elements
  header.position(random(windowWidth), random(windowHeight));
}
9.6 — Button Eventrepo ↗
var button;
var bg;

function setup() {
  createCanvas(windowWidth, windowHeight);
  bg = color(0);
  button = createElement("button", "click me");
  button.position(20, 20);
  // anonymous callback function, runs only when the button is pressed
  button.mousePressed(function () {
    bg = color(random(255), random(255), random(255));
  });
}

function draw() {
  background(bg);
}
9.6 — Text Inputrepo ↗
var inputTextElement;
var inputText = "";

function setup() {
  createCanvas(windowWidth, windowHeight);
  background(220);
  inputTextElement = createInput();
  inputTextElement.position(20, 20);
  // named callback function
  inputTextElement.input(handleInput);
}

function handleInput() {
  // this ⟶ the input element
  inputText = this.value();
}

function keyPressed() {
  if (keyCode === ENTER) {
    text(inputText, random(width), random(height));
  }
}